


Hey there, fashion enthusiasts! Let's dive into an incredibly cool technique that will take your shirts to a whole new level of awesomeness! We're entering the exciting world of bleach for sublimation, where vibrant and intense colors come alive in style!
Think of bleaching techniques as your creative playground. Unleash your inner artist and let your imagination run wild to create unique and artistic designs that will make your shirts stand out from the crowd. That means you can create mind-blowing patterns, mesmerizing gradients, or even edgy distressed effects that give your shirts that extra oomph. Whether you use stencils for precision or go freestyle, the possibilities are endless. It's like painting with bleach and transforming your shirts into wearable masterpieces!
And guess what? If you're wondering how to bleach shirts for sublimation, you've come to the right person! I possess a wealth of valuable advice and techniques that will assist you in attaining awe-inspiring outcomes.
Best Shirts to Bleach for Sublimation
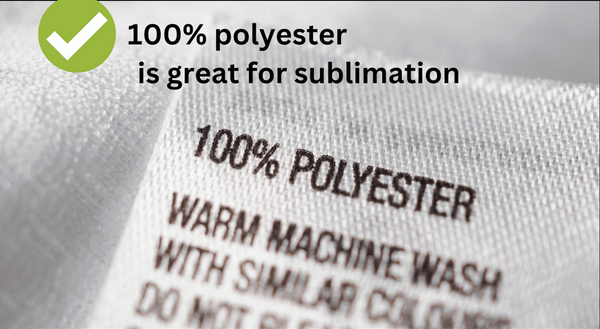
Sublimation ink has a special bond with polyester. The more polyester your shirt has, the more vibrant and vivid your transfer will turn out. So, 100% cotton shirts won't work for this technique! The best shirts to go for are usually those fabulous poly-blends. They offer the perfect canvas for your sublimation creations to shine!
My own shirt is rocking a 40% polyester composition, and let me tell you, it's going to give the design a seriously cool faded look.
Bleaching Shirts for Sublimation Supplies Needed
1. A polyester or polyester blend shirt
2. Bleach
3. Spray bottle
4. Plastic gloves
5. Protective eyewear
6. Cardboard box or garbage bags
7. Water source (sink or bucket)
8. HTVRONT Easy Heat Press
How to Keep Safety in Sublimation?
Remember, safety first! As we prepare to embark on a captivating journey of bleaching, let's ensure that we prioritize the essential safety measures. Below, you'll find a set of safety guidelines to bear in mind when handling bleach and chemical substances.
1. It's always best to work in a well-ventilated area, like the great outdoors. This way, you'll have fresh air flowing and minimize any potential fumes.
2. Protect those precious hands of yours. Don't forget to wear gloves and protective eyewear to shield your skin or eyes from direct contact with bleach.
3. It's best to wear clothes and shoes that cover your skin during the process. I personally like to wear old clothes, so I'm not worried about accidentally getting any bleach on them. Trust me, even a tiny drop of bleach can wreak havoc on your favorite outfit!
4. After the bleaching, make sure to wash your shirts a few times to remove any excess chemicals. We want those shirts to be clean, fresh, and ready to rock!
How to Bleach a Shirt for Sublimation?
Step 1: Dilute the Bleach
If you're using concentrated bleach, it's time to play chemist! Dilute it with water, following the instructions on the bleach bottle. This particular step holds immense significance as it empowers you to regulate the potency of the bleach mixture while preventing any potential mishaps with fabrics.

Step 2: Protect the Shirt
We're going to make sure that bleach stays where it's supposed to and doesn't sneak its way to the back of your shirt. Gently slide that cardboard or unfold that garbage bag and place it inside your shirt. This clever trick will create a barrier and prevent any bleach from bleeding through to the back of the shirt. I personally find working with cardboard a breeze, so I'm using a sturdy cardboard box.
Step 3: Spray the Shirt
Lay that shirt flat on a protected surface. Fill up your trusty spray bottle with the diluted bleach solution and unleash your creativity. Spray it evenly over the areas you want to bleach, and let those design dreams come to life! Get fancy with patterns or go wild with stencils. Start with a light touch, and if you crave more bleach power, go ahead and add more.
Step 4: Allow the Bleach to React
Once you've sprayed the bleach, it's time to sit back and let the fabric work its magic. Allow the bleach to react with the fabric for a specific period, usually around 5 to 10 minutes. Keep a close eye on the progress, as it can vary depending on your desired level of bleaching and the fabric type. We're on our seats for that perfect effect!
Step 5: Rinse and Neutralize
It's time to rinse away the bleach and bring things back to balance. Give the shirt a thorough cold-water rinse to remove all traces of bleach. We want to bid farewell to any lingering bleachiness. After that, let's neutralize any leftover bleach by soaking the shirt in a mixture of water and hydrogen peroxide for a few minutes.
Step 6: Wash and Dry
Wash that shirt separately using a mild detergent, ensuring all the bleach residue is gone. Follow the fabric care instructions like a pro. After the wash, let the shirt air dry or use a clothes dryer, depending on what your fabric demands.
Step 7: Sublimation Printing
Once your bleached shirt is completely dry, it's time to unleash the power of sublimation. Follow the instructions from your sublimation printer, sublimation paper and HTVRONT Easy Heat Press to ensure a vibrant and successful print. Those bleached areas will be the perfect backdrop, giving your sublimation ink an extra punch of uniqueness and catch-all-the-eyes magic.

Congratulations, my friend! You've just mastered the art of bleaching and sublimation. Now go out there and rock that fabulous, one-of-a-kind shirt like a true fashion superhero!


![[Starter Kit] Auto Heat Press Machine 15" x 15" 110V + Starter Kit Bundle](http://www.htvront.com/cdn/shop/files/20240425-170634_385x.jpg?v=1714036345)
![[Premium Bundle] Auto Heat Press Machine 15" x 15" 110V + 20 rolls HTV Bundle 12“x3ft + Mini 2 Heat Press Machine + Random Sublimation & HTV Bundle ≥ $180](http://www.htvront.com/cdn/shop/files/1UK_4_22c12b1b-12dd-4105-ac25-93e2faae6a8c_385x.jpg?v=1713863580)


