


Epoxy resin has been quite a hit nowadays since this special material can help many crafters make shiny, glossy, and iridescent jewelry and trinkets!
How to use epoxy resin is actually not as complicated as you thought. Follow my lead in this tutorial and get an inkling of this liquid material and epoxy resin pigment, and you will quickly get into the groove of this creative activity.
What is epoxy resin?
First, you have to be aware of the composition of epoxy resin and the way it works.
Epoxy resin is a type of synthetic resin that works in a chemical way. It's also called polyepoxide, which is a polymer containing epoxide groups. Typically, users need to combine two adhesives in a particular proportion and mix them uniformly to apply. After the completion of the blender, the special fluid adhesive will cure under heat or radiation exposure.
You may have also heard of UV resin, which looks and works similarly to epoxy resin while designing handicrafts. If you are going to make some pretty tiny decorations with resin, the UV resin can be tantamount to epoxy. But this rule is not very suitable for large innovative items because the UV resin always requires a UV light to harden, which can be time-consuming and laborious.
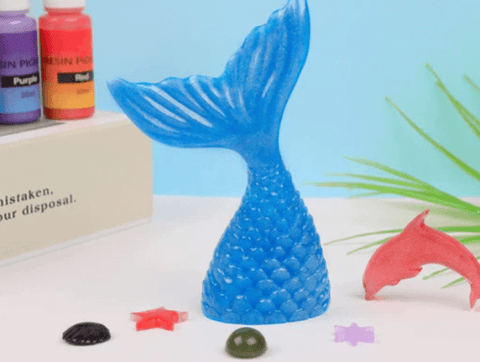
Back to the topic. During the mixing process, you can design expressly with your wild imagination by adding epoxy resin color pigment to magnify the beauty of the final projects.
OK, now let's move on to the step-by-step tutorial on how to make epoxy resin art.
What materials are needed to use epoxy resin?
No matter what kind of project you are about to create, make sure you have made plenty of provisions. Here's my preparation list.
1. Rubber gloves
2. Plastic wrap
3. Plastic Apron
4. Disposable respirators
5. Baby wipes
6. A wooden stick
7. Disposable plastic cup (small)
8. Measuring cups (small)
9. Epoxy resins A and B
10. Silicone Molds
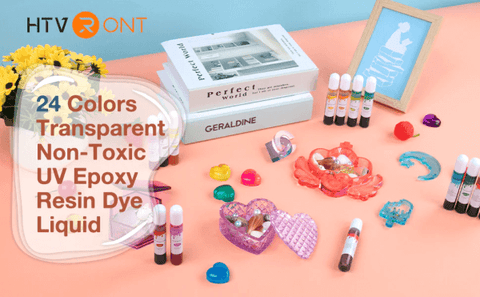
11. Epoxy resin color pigment
12. Epoxy resin pigment powder
13. Embellishments (glitter, dry flowers, tiny beads, etc.)
14. Heat gun/blow torch
15. Hot glue gun (for making pieces of jewelry)
How to use epoxy resin?
Following the completion of the prepared materials, let's dive into the detailed procedures. Usually, you will get two bottles of adhesive after you make a purchase. One is marked with an "A," while another is marked with a "B.". This way, you're able to distinguish them easily and control their usage.
Put on your gloves, apron, and respirator. From my experience of crafting epoxy resin phone cases, sometimes there may be extra resin blenders running over the mold edges and being left on the table, which is really hard to get rid of once they are cured. That's why I always prepare some pieces of plastic wrap on the table to prevent such things and save my cleaning time.
You must note that once you get some epoxy resin on the skin or table, wipe off the adhesive immediately with baby wipes to avoid further curing.
Pick up two measuring cups. The measuring cup size usually depends on the projects you will make and the consumption of each type of adhesive. The adhesive ratio varies from brand to brand and method, from 1:1 to 4:1.
Personally speaking, I prefer the 1:1 ratio, which is convenient to calculate and pay attention to. Therefore, I usually get the exact brand with the proper ratio that is suitable for me. Make sure to check the instructions and the correct ratio before you dive into the creative activity.
Pour slowly with A and B epoxy resin into two different measuring cups according to their ratio, and pour them orderly into a plastic cup or mixing cup. Then, stir with a wooden stick slowly and clockwise to avoid producing more air bubbles.
Usually, I'm used to stirring with the stick close to the wall of the mixing cup so as to better pop the air bubbles generated while blending. If there are too many bubbles that upset you a lot, you can also try to warm the bottle of epoxy resin before pouring the liquid out or use a heat gun or a blow torch to swipe the surface of the final blender quickly.
Do it now if you want to get shiny and glossy pigmented epoxy resin!
Mix the adhesives until the blender is clear, and dot it with epoxy resin pigment or some pretty embellishments like glitter, dry flowers, tiny beats, and even some custom decorations. For those little and scattered embellishments, you often need to stir them together with the resin blender so that your final results can have a uniform visual effect.
Clean your silicone molds to make sure there's no lint, debris, glitter, or dust at all. Now, pour the concoction into the mold with patience. Take advantage of the stirring stick to fill the edges and each corner with the pigmented epoxy resin and smooth the surface out with no extra substance.
At last, what you need to do is to find a flat place to allow the epoxy resin to cure for 24 hours at room temperature. If you apply some high-temperature methods, the curing time can be shortened.
Once it gets hard, take it out of the molds and put on some jump rings or set it as sweet home decor as you want. And if you're going to make some personal hairclips, get some barrettes and fix the bottom with the resin top together with a hot glue gun. The method works for other projects too.
FAQs
1. Where to buy epoxy resin?
It's easy to answer the question of where to buy epoxy resin. There are lots of epoxy resins available online that you can find on Amazon. Choose the ones with high ranks and the right ratio for your needs.
As for epoxy resin color pigment, I prefer to use HTVRONT epoxy resin pigment, and it turned out to be outstanding and flawless many times during the mixing process. It combines diverse forms, like liquid pigments and pigment powders, and effects like glitter, chameleon, and glow-in-the-dark. And the pigmented epoxy resin does retouch tons of my projects that could have been mundane and plain! Love them!
2. How to polish epoxy resin?
With the passage of time, you will find out that the epoxy resin projects are getting yellow and scratched. You may be bewildered about how to polish epoxy resin after it’s been through an extended period.
Typically, I would implement the polishing work with a soft towel filled with soapy water and a sheet of sandpaper. The sandpaper is for removing the scratches, and the towel is for cleaning the grit and dust on the surface.
3. How to color epoxy resin?
Once you get some epoxy resin pigment, you will never be bothered by the question of how to color epoxy resin. Epoxy resin color pigment allows you to demonstrate your ideal color management and beautify translucent projects.


![[Starter Kit] Auto Heat Press Machine 15" x 15" 110V + Starter Kit Bundle](http://www.htvront.com/cdn/shop/files/20240425-170634_385x.jpg?v=1714036345)
![[Premium Bundle] Auto Heat Press Machine 15" x 15" 110V + 20 rolls HTV Bundle 12“x3ft + Mini 2 Heat Press Machine + Random Sublimation & HTV Bundle ≥ $180](http://www.htvront.com/cdn/shop/files/1UK_4_22c12b1b-12dd-4105-ac25-93e2faae6a8c_385x.jpg?v=1713863580)


