


Organizing a memorable wedding can be expensive, with a study by The Knot revealing that an average wedding in the US costs around $30,000. When organizing a wedding, you must consider expenses like venues, gowns, transportation, invitation cards, etc. For this reason, you might be looking for ways to save money.
One of the best ways to cut costs in this once-in-a-lifetime event is by making your own DIY Cricut wedding invitations. With your Cricut machine, you’ll enjoy endless versatility, designs, and customization options. So, please continue reading to discover our well-researched list of Cricut wedding invitation ideas and how to make one with your vinyl plotter.
Part 1: 4 Popular Cricut Wedding Invitations
If you want to take your wedding invitations to the next level, you must get it right when it comes to those cards. These cards will create the first impression about the event to whoever you extend the invitation to. So, without wasting time, let’s list and discuss four wedding invitation inspirations for that special event.
1. Green Leaves Pattern Paper Invitation
What’s needed:
- Green Cardstock
- Cricut Explore Air or Maker machine
- Cutting Mat
- Adhesive dots
- Glue tape runner
- SVG file of your choice
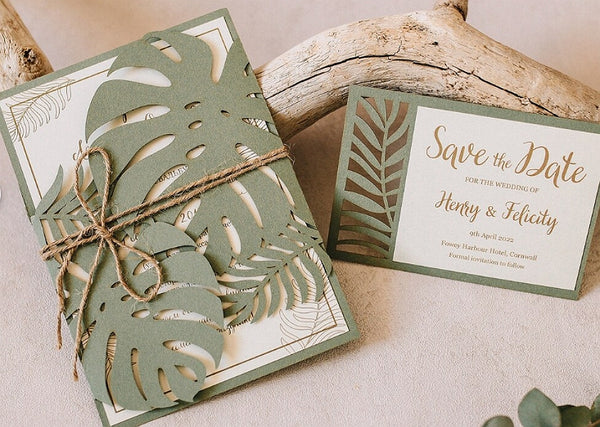
You can deliver an exotic tropical vibe with this monstera leaf invitation project. It features a 5x7” SVG monster leaf template and a 5x3” palm leaf response card. This beautiful and intricate wedding invitation comes with an intricate laser-cut leaf, foil frame, and a response card to perfectly capture the feel and style of your “big day.”
Note that you’ll need a 12x12” scrapbook-size cardstock to make this project a success. This card is perfect for destination, Caribbean, abroad, travel, and tropical invitations. Download the Monstera Leaf Wedding Invite SVG file here. Also, feel free to use any SVG leaf design as long as it perfectly expresses your idea.
2. A Couple of Silhouette Paper Invitation
What’s needed:
- Red Cardstock
- Cricut Explore Air or Maker machine
- Cutting Mat
- Adhesive dots
- Glue tape runner
- SVG file of your choice
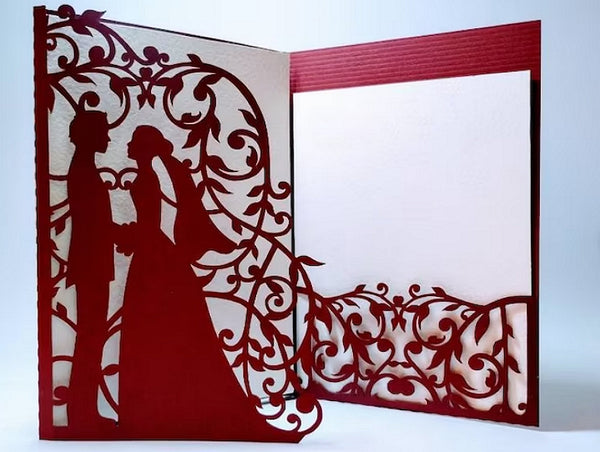
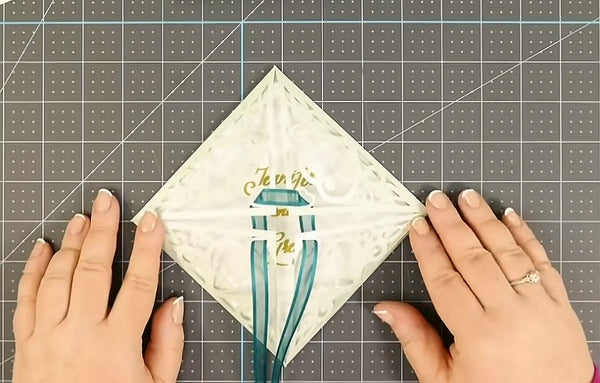
You can as well skip this Silhouette invitation car if you’re planning a same-sex wedding event. This cut project shows the bride and groom holding hands inside whimsical vines to deliver a lovely fairytale wedding vibe. It features a 5x7” bride and groom laser cut wedding invitation and a romantic red card paper cut die.
But before using this beautiful SGV bride and groom file, we recommend customizing it further to make the design your own. You may also want to change the red cardstock color to something like steel blue or create it using glitter cardstock. It’s a simple design with no glue or joining marks. Just clean folds!
3. Wooden Invitation
What’s needed:
- Wood Blank
- Black Heat Transfer Vinyl
- Cricut Explore Air or Maker machine
- Heat Press, Cutting Mat
- Weeding tool
- Adhesive dots
- Glue Tape Runner
- SVG file of your choice
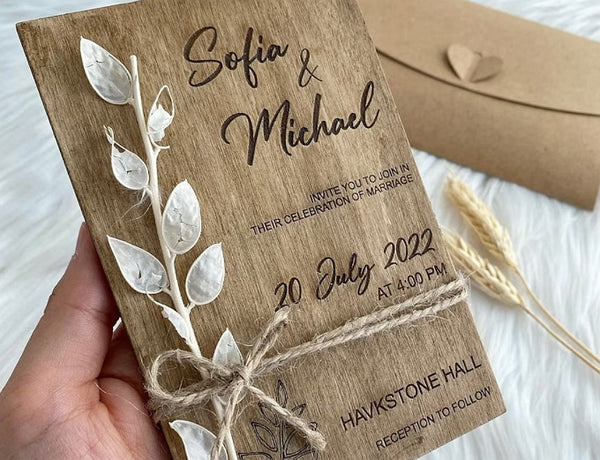
This is one of the most captivating, natural-looking handmade invitation cards on this list. It’s perfect for weddings, anniversaries, engagements, and other romantic occasions. This invitation uses natural materials like wood, flowers, and juke rope to create a realistic outdoor feel. The wooden invitation is printed using Cricut Maker’s laser engraving.
We also like this wooden invite for its somewhat ‘rustic’ appearance. It also offers a simplistic appearance while delivering that earthly and elegant look. Remember, you can use a font of your choice on Cricut Design Space or whatever software you use to edit this SVG file.
4. Acrylic Invitation

What’s needed:
- Acrylic Blank
- White Adhesive Vinyl
- Glossy Printable Vinyl
- Cricut Explore Air or Maker machine
- Cutting Mat
- Weeding tool
- Adhesive dots
- Glue tape runner
- SVG file of your choice
We dug deep and found this fancy-looking acrylic wedding invitation that you should try. This wedding stationery is undoubtedly one of the most beautiful customized invitations for the big event. It comprises transparent acrylic material with your message printed on top. It also features some lovely floral designs, making your invitation almost irresistible.
Excitingly, this design can double up as a frame art to place on your desktop, shelf, cupboard, or any other place. Match the floral patterns and designs with what you want for the occasion to make this wedding invitation project even more interesting. And yes, it’s easy to handle and lightweight.
Part 2: How To Make Wedding Invitations On Cricut
Now that you know some cool wedding invitation ideas to share with your friends, let’s dust off our vinyl plotter and learn how to make Cricut invitations. Below are the straightforward steps:
Step 1. Design the Invitation.
First, you must determine the design you want for your wedding invitation. You can create an SVG design from scratch using Photoshop or buy a ready-made design on Etsy for anywhere between $2 to $25. You can also find template free wedding invitation SVG files for Cricut on Loklikworkshop.com.
Step 2. Prepare materials and Cricut machine.
The next step is preparing the materials you need for the project. Always remember to carry along essential materials like scoring stylus, fine point blades, weeding tools, and more. Remember, you don’t necessarily need Cricut Maker for this project because Cricut Explore or Joy will work just fine.

Step 3. Load design and adjust settings.
Now start a New Project on Design Space, then click Upload to load your SVG file on this editing software. Proceed to save the design and edit it accordingly. For example, you can change the font styles, adjust size, or make new project patterns.
Step 4. Cut the invitations.
Once your design is ready, it’s time to do that cut. Start by inserting the cutting mat into your machine and press the “Load” button. Press “Play” to cut your design if the machine is ready to cut. Repeat the same process on multiple wedding invitations until you get your desired number.

Step 5. Customize your invitations with additional elements.
Before sending out your wedding invitations, you may want to customize them with additional elements like a juke rope, ribbon, flowers, and more. The idea is to make your invitations look as catchy as possible.
Part 3: Faqs
Q1: Is it cheaper to DIY wedding decorations?
Yes, you’ll save a lot by doing your wedding decorations yourself. This is true even if you decide to purchase a brand new Cricut machine and all the project materials. Making handmade wedding invites also allows you to decorate the designs to your liking.
Q2: Can you make wedding programs with Cricut?
Your Cricut machine allows you to make almost anything you can think of for the big day. Besides wedding invitations, you can also make even decals, gift cards, printed shirts, event mugs, and more.
Q3: Which Cricut machine is best for wedding decorations?
This depends on your project and budget. For instance, Cricut Maker is the best option if you want a powerful machine that can cut 300+ materials, including wood and leather. However, Cricut Joy and Cricut Explore should easily handle most wedding decorations.
Final Words
There you have it, friends! These are some Cricut wedding invitation templates to try on your next big project. Invitation cards often create the first invitation by offering a glimpse of what the event will look like. So, it’s vital to get it right at this stage.


![[Starter Kit] Auto Heat Press Machine 15" x 15" 110V + Starter Kit Bundle](http://www.htvront.com/cdn/shop/files/20240425-170634_385x.jpg?v=1714036345)
![[Premium Bundle] Auto Heat Press Machine 15" x 15" 110V + 20 rolls HTV Bundle 12“x3ft + Mini 2 Heat Press Machine + Random Sublimation & HTV Bundle ≥ $180](http://www.htvront.com/cdn/shop/files/1UK_4_22c12b1b-12dd-4105-ac25-93e2faae6a8c_385x.jpg?v=1713863580)


