


Hat heat press machine is seeing booming development in the crafting sector, covering Cricut Hat Press, HTVRONT Hat Heat Press, Vevor Hat Heat Press, Hotronix Hat Heat Press, and so on. If you are new to this machine and want to start your Cricut journey, hope this article finds you well. In this blog, we're here to give you an in-depth look at the Cricut Hat Press, how to use the machine, and how to adjust the Cricut Hat Press temp. As such, keep reading to initiate the first crafting project.
Part 1: An Overview of Cricut Hat Press
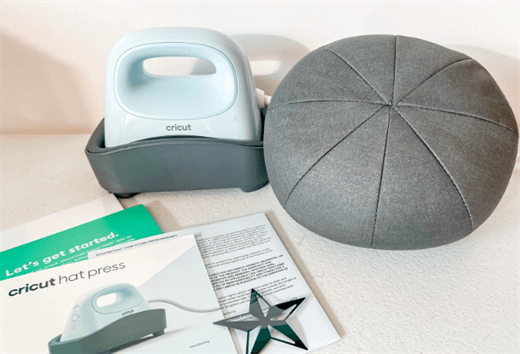
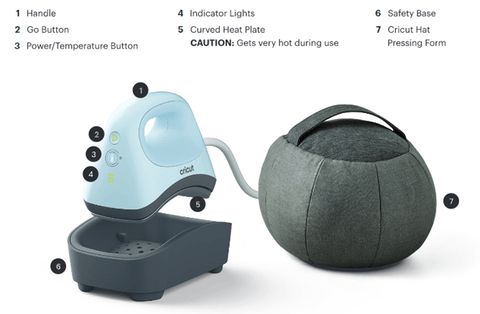
The Cricut Heat Press boasts a patent-pending curved heat plate accompanied by a flexible pressing form. This adjustable pressing form accommodates a wide array of hat styles, ensuring a stabilized surface for curved materials during the pressing process. Furthermore, the machine features an insulated safety base, maintaining a secure position throughout operation.

In addition to its innovative design, the hat-making machine is equipped with customized material and pre-set heat settings, allowing for efficient customization. With the capability to reach temperatures of up to 400°F (205°C), it accommodates various brands, including Iron-On (HTV), Infusible Ink, and sublimation products. Moreover, it effectively covers the usable surface area without causing damage to the material, ensuring precise results from all angles.
Different from the HTVRONT Hat Press, Cricut ensures crafters to install the Cricut Heat application to complete their DIY projects. This app seamlessly connects to the machine via Bluetooth, facilitating direct communication and control. You can easily download and install the Cricut Heat app from both the Google Play Store and the Apple Store, ensuring compatibility with a wide range of devices.
Part 2: How to Use Cricut Hat Press
Step 1: Weed Your Design within Cricut machines
In the first place, you should select and size your design within the software interface. For hat embellishments, it’s advisable to adhere to a maximum size of 2.25 inches in height by 4.25 inches in width (5.7 cm by 10.79 cm) or smaller. Prior to initiating the cutting process, ensure that you mirror your mats within Design Space. This step is crucial for achieving accurate cuts.
Next, you are asked to carefully select the appropriate iron-on material. If utilizing a Cricut Explore Air 2 or an older cutting machine, adjust the Smart Set Dial to Custom for precise settings. And then, you need to position the iron-on sheet onto the Cricut StandardGrip cutting mat, ensuring that the liner side faces downward. If utilizing Smart Iron-On with a Cricut Joy, it can be loaded directly into the machine without the need for a mat. Proceed to load the material into the machine and initiate the cutting process as per your design specifications.
Upon completion, you should weed your image to remove any excess material, thereby ensuring a polished and professional outcome.
Step 2: Apply Your Design to Hat
Begin by preheating the base material as instructed in the Cricut Heat app, you can subsequently position the design face down, ensuring the liner side faces upward, and secure it with Strong Heat Resistant tape. Next, it is asked to place the hat pressing form and hat in an upright position on the work surface, with the pressing area facing upward. While holding the hat pressing form securely with one hand on the side, apply pressure with the other hand in a steady, side-to-side motion during the pressing process is recommended. Upon completion, you should gradually lift the press. Finally, the design is allowed to cool to the touch before delicately removing the liner.
Part 3: How to Adjust Cricut Hat Press Temperature
Method 1: Adjust Cricut Hat Press Temperature Manually
Connect the Cricut Hat Press to a compatible wall outlet and activate it by pressing the power button. Upon completing the setup process, use the Temperature button to navigate to your preferred heat setting. Press the Temperature button to toggle between low, medium, and high heat settings.
Select the "Low" setting for lightweight, delicate, synthetic, or heat-sensitive fabrics, as well as for more delicate iron-on materials like Foil Iron-On. Opt for the "Medium" setting for most fabrics and heat-transfer vinyl applications. Choose the "High" setting for Infusible Ink™ and sublimation projects, as well as compatible blanks.
Method 2: Adjust Cricut Hat Press Temperature Using App
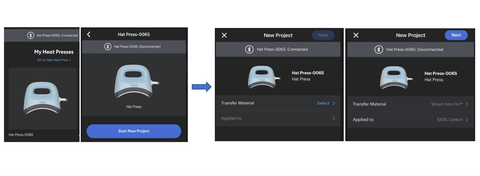
To begin, you should plug the Cricut Hat Press into a compatible wall outlet and activate it by pressing the power button. Subsequently, launch the Cricut Heat app on your device. Within the app, navigate to "My Heat Presses," where you will locate and select the Cricut Hat Press, and then initiate a new project by selecting "Start New Project." Following this step, proceed to choose your desired transfer material and the corresponding base material for application, then proceed by selecting "Next." Upon finalizing all selections, opt to "Send Settings to Hat Press," and diligently follow the on-screen prompts to successfully complete your project.
As mentioned above, these are the recommended time & temp settings using the Cricut Hat Press. On the other hand, you can also set custom time & temp settings. You are allowed to access the Cricut Heat app and navigate to the "My Heat Presses" section. From there, choose the Cricut Hat Press and locate the "Set Custom Time & Temp" option, and adjust the temperature and press time according to your project requirements. Additionally, you have the option to preheat the blank if desired. Once all adjustments are made, select "Send Settings to Hat Press" to transmit the updated settings.

In conclusion, the topic of the Cricut Hat Press is expounded in detail. After reading the latest blog, you must have grasped a basic understanding of the hat press machine to embark on your journey in the DIY sector.


![[Starter Kit] Auto Heat Press Machine 15" x 15" 110V + Starter Kit Bundle](http://www.htvront.com/cdn/shop/files/20240425-170634_385x.jpg?v=1714036345)
![[Premium Bundle] Auto Heat Press Machine 15" x 15" 110V + 20 rolls HTV Bundle 12“x3ft + Mini 2 Heat Press Machine + Random Sublimation & HTV Bundle ≥ $180](http://www.htvront.com/cdn/shop/files/1UK_4_22c12b1b-12dd-4105-ac25-93e2faae6a8c_385x.jpg?v=1713863580)


