


Cricut Maker is one of the best vinyl plotters that money can buy. This machine has exemplary features, including support for hundreds of materials, fast cutting speed, and Design Space compatibility. However, if you’re still a beginner DIY crafter, you might wonder how to use a Cricut Maker for the first time in your project. In that case, continue reading to learn the step-by-step guide to using this cutting machine. We’ll also answer some common questions about this powerful machine.
Part 1: Basic Information About Cricut Maker
Released in August 2017, Cricut Maker is a next-gen smart cutting machine that provides avid crafters and DIY-yers with more versatility and a powerful performance. It’s the predecessor of the innovative Cricut Maker machine, which supports “matless” cutting due to compatibility with Cricut Smart Materials.
Unlike the Explore Air series, which can cut 100+ materials, the Cricut Maker lineup allows you to work with 300+ materials. You can use it to cut almost any material, ranging from paper and fabric to thick materials such as wood and chipboard. Moreover, it can cut traditional craft materials like heat transfer vinyl, adhesive vinyl, and cardstock.
Another thing that you should note about this plotter is that it offers 10x more cutting power than the Explore Air series. Cricut Maker can also cut materials up to 4 inches per second and comes with the “Fast Mode” to speed up the process. But as fast as this may sound, it’s still 2x slower than the Maker 3 model, which can cut up to 8 inches per second.
It’s also worth noting that Cricut Maker comes with an expandable set of revolutionary tools, including two blades for cutting, writing-on, and scoring more materials. While at it, you can control the blade direction and adjust the cutting pressure to match your project materials. Plus, this machine supports the “Print-Then-Cut” feature that makes it compatible with your home inkjet printer for cutting full-color designs.
Part 2: How To Use Cricut Maker
Now that you know a few details about this machine, let’s learn how to use my Cricut Maker for a DIY t-shirt project. Remember, you can use this vinyl plotter for different projects, including creating cards, party decorations, gift mugs, and more. But before that, we advise you to take some time to learn how to calibrate Cricut Maker and use the Design Space software.
Below are the four detailed steps on how to use Cricut Maker to create a t-shirt design:
Step 1: Prepare the project materials.
This is the first thing you must do to avoid any inconveniences during the project. Start by activating your new Cricut Maker machine at https://design.cricut.com/#/setup. It’s even easier if you already have a Design Space account. Open the menu icon, then select “New Product Setup” to follow the prompts to your Cricut machine.
Once you have your machine up and running, you’ll need to collect the following materials for our DIY t-shirt design:
- Heat transfer vinyl: You’ll need iron-on vinyl to apply heat and pressure when transferring your designs to the fabric. Ensure you choose a htv material that can withstand washing and ironing to prevent peeling, cracking, and fading.
- Heat press: The type of heat press machine may depend on the project size. For example, use HTVRONT Auto Heat Press to craft bulk t-shirts for your project or business. You can also use the smaller Mini Heat Press for DIY home crafts.
- T-Shirt: Get a blank t-shirt of any color while considering the color of your designs. Also, ensure the t-shirt material is cotton, polyester, and cotton-poly.
- Cutting mat: A cutting mat will give you a firm grip while cutting designs to ensure more precise cuts. It also lets you peel off your designs quickly and is more straightforward to clean. Note that Cricut Maker 3 and Cricut Explore 3 support matless cutting.
- Weeding tools: Always carry your weeding tools along when dealing with Cricut projects. These tools are essential for removing excess vinyl, iron-on, and infusible ink.
- T-shirt design: If you have graphic design skills, you can easily craft a design on Adobe Photoshop, Illustrator, Vectr, and other programs. But if you don’t have time and skill, you can find thousands of designs on Design Space’s templates or head to LOKLiK.com for free SVG images.

Step 2: Prepare your image on Cricut Design Space.
Next, proceed to create a design on Cricut Design Space. Follow these steps to design from scratch:
- Open Cricut Design Space, then tap the “New Project” button.
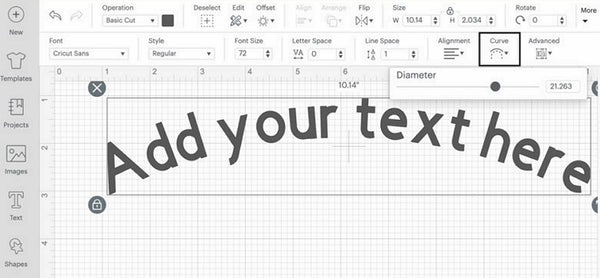
- After landing on the canvas, click “Upload” to load an SVG file you intend to use. You can also click the “Text” tab to create quotes for your t-shirt design.
- Now, this is the fun part. You can edit the text by curving or resizing it to fit your preference. Also, click “Mirror” to flip the design before clicking “Continue.”
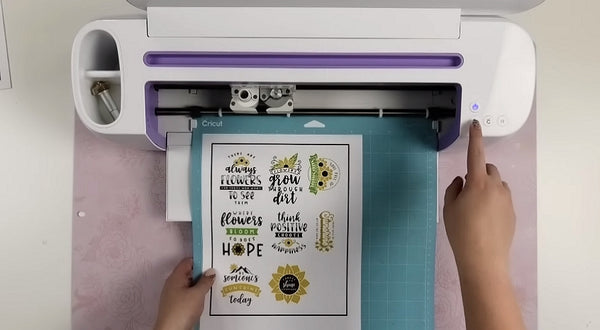
Step 3: Cut the material with a Cricut Maker.
If you’re happy with the design, tap “Make It” to prompt the editing tool to send the information to Cricut Maker for cutting. Remember to insert the cutting mat into the machine, then click “Play” to cut the design. Click the arrow button to remove your cutting mat.
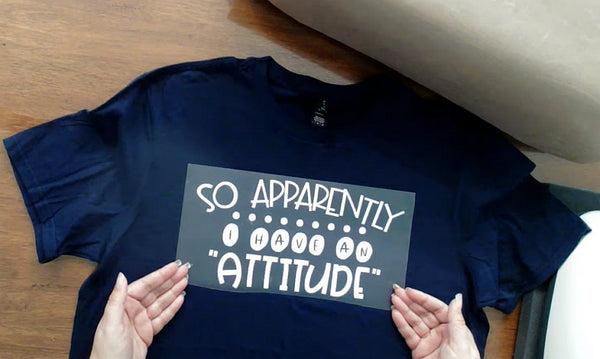
Step 4: Transfer the design to your t-shirt.
Once you have finished cutting and unloading the design, grab your weeding tool to remove the excess vinyl gently. This is what we call “weeding.” After weeding the design, apply it to your preferred position on the t-shirt using a heat-press machine. But first, ensure that the t-shirt is dry and clean. Also, consider pre-heating the garment for 10 seconds before applying the design.
Part 3: Faqs
Q1: What do you need to start a Cricut Maker?
After unboxing your brand-new Cricut Maker software, connect it to your smartphone or desktop via Bluetooth. But to achieve that, you must install the Cricut Design Space software on your mobile or computer.
Below is how to pair Cricut maker to phone:
- Enable Bluetooth on your phone.
- Select the Cricut machine on your Bluetooth list.
- Pair the machine to your phone by entering a code if prompted.
- Open Design Space, then click New Product Setup to connect the machine to your phone.
Once your Cricut machine is ready to cut, assemble the tools needed for the project. This includes a cutting mat, heat transfer vinyl, heat press machine, weeding tools, and more.
Q2: What Cricut Maker?
There are lots of projects you can achieve with your Cricut Maker machine. Below are some DIY crafts to do at home:
- Iron-on decals for t-shirts, blouses, caps, and other fabrics
- Invitation cards for parties and weddings.
- Labels for tumblers, lunchboxes, mugs, cups, water bottles, and more.
- Home ornaments
- Professional-looking party banners
- Creating wooden decorations like milestone discs
- Paper masks
- Car window decals
Q3: Can you get free Cricut Maker designs?
You can get free Cricut Maker SVG files by designing from scratch on programs like Adobe Photoshop or Illustrator. Alternatively, you can download free unlimited designs on Loklikworkshop.com.
Q4: Can you use smart vinyl on Cricut Maker?
Technically, you cannot use Cricut Smart Materials on Cricut Maker because these materials are only compatible with Cricut Maker 3, Cricut Explore Air 2, and Cricut Joy. But if you must use them on Cricut Maker, ensure that you place the materials on a cutting mat.
Final Words
Up to here, we are confident you know how to use a Cricut Maker machine. The trick is to get as much experience as possible with your machine. Leave us a comment if you have any questions, or share your creative DIY crafts with us. Have fun!


![[Starter Kit] Auto Heat Press Machine 15" x 15" 110V + Starter Kit Bundle](http://www.htvront.com/cdn/shop/files/20240425-170634_385x.jpg?v=1714036345)
![[Premium Bundle] Auto Heat Press Machine 15" x 15" 110V + 20 rolls HTV Bundle 12“x3ft + Mini 2 Heat Press Machine + Random Sublimation & HTV Bundle ≥ $180](http://www.htvront.com/cdn/shop/files/1UK_4_22c12b1b-12dd-4105-ac25-93e2faae6a8c_385x.jpg?v=1713863580)


