


As a handicraft lover, a heat press machine has become an essential tool in my life. I used to use a manual one. It's bulky, not very pretty, and takes a lot of effort to use. Most of the automatic heat presses on the market are expensive and complicated to use. So, I was eager to have my own cheap, good-looking, and intelligent auto heat press until HTVRONT Auto Heat Press came into my life. It fulfills almost all my fantasies about a heat press!
Next, in this guide, I am going to show you how amazing the HTVRONT Auto Heat Press is and teach you the detailed steps to use it. It's really easy, so you don't need to worry if you are a new user.
Part 1: What is HTVRONT Auto Heat Press?
If you are new to the crafting world, you may have yet to hear about HTVRONT Auto Heat Press: the latest product of HTVRONT, a thoroughly redesigned and automatic heat press.
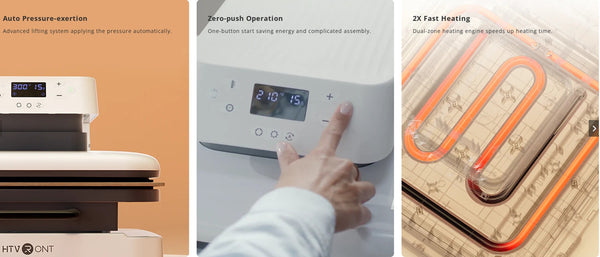
Unlike the time-consuming and laborious traditional heat presses on the market, the HTVRONT Auto Heat Press completes the whole heat pressing process with just one button. You only need to place the material in advance and set the corresponding time and temperature according to the instructions. The HTVRONT auto heat press is not only suitable for craftsmen in mass production or small businesses but also for beginners who have a keen interest in handcrafts.
Free Your Hands with HTVRONT Auto Heat Press
- Heat up to 320℉ /160℃ within 4 mins, saving 2minutes than common type.
- Upt to 4 fast modes, 2 custom modes and an auto mode for your creativities.
- Separated ironing board and auto shut-down design for your safety.

Part 2: Features of HTVRONT Auto Heat Press
As it advertises, the HTVRONT automatic heat press machine is now designed with many intelligent features to make it stand out from the crowd.
1. Fast heating
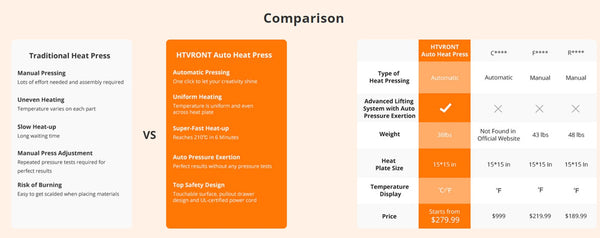
HTVRONT Auto Heat Press is much more efficient than other brands. The auto heat press machine only takes about 6 minutes to heat from room temperature to 410℉(210℃). And it will need less than 4 minutes to reach a common-use temperature of 320℉(160℃), almost twice as fast as other machines.
2. Smart-heat press
This digital heat press machine can automatically adjust the pressure depending on the materials you choose. Even more convenient, if you don't use the automatic heat press machine for ten minutes, it will turn itself off.
3. Evenly heating
The auto heat press machine can provide even heat edge-to-edge with the dual-zone heating engine. Its sole plate is combined with NTC thermistor technology to control the actual temperature and time more precisely.
4. Safety use
This heat press fitted separate heating and placing areas with insulation to prevent accidental burns. The auto heat press machine can cool down much faster than before due to the H-Cooling technology, an innovative method of heat dissipation for HTVRONT. With FCC & UL certification, the auto-open heat press also meets the required safety standards.
5. Various modes of setting
HTVRONT Auto Heat Press features 4 fast modes and 2 user-defined modes. And the continuous ironing mode of the vinyl heat press machine can help you create projects in batches.
6. Light weight
This automatic heat press is light (38 pounds) and easy to carry or place. So, you will save a lot of energy and time when using the digital heat press machine
7. Wide application
Included is a 15*15in heat plate inside. The HTVRONT Auto Heat Press suits various DIY projects of all sizes. The digital heat press machine will be a good help in customizing projects on all kinds of vinyl or sublimation paper.
Part 2: Features of HTVRONT Auto Heat PressPart 3: How To Use HTVRONT Auto Heat Press?
Before we start, I'll show you the function of each button.
As you can see, the buttons on either side of the screen are "temp," "time," "+," "-," and "start," and the three bottom buttons are "Mode," "Custom," and "Auto."
Tips:
1. The start button will flash a red light when the machine is heating up, while it will feature a long green light and beeps when reaching the set temperature.
2. Press and hold the "temp" button for 3 seconds to switch between Celsius and Fahrenheit.
3. Press "Temp" \ "Time" to set the temperature \ time, and adjust the temperature \ time with the "+" or "-" buttons.
4. HTVRONT heat press settings:

Steps to use HTVRONT Auto Heat Press:
Step 1: Heat up your machine
Press the switch button to power on your vinyl heat press machine, and the screen will display the temperature and time. Then set the corresponding time and temperature based on the HTVRONT Auto Heat Press Guide. The following instructions apply to the material and blank I have chosen, so be sure to modify them according to the operation instruction. I set mine to 260℉ for 10 seconds for the preheating.
Step 2: Preheat your blank
Pull out the placing area, and you will find a heat press mat with rubber bands for fixing. Place the blank (I use a shirt.) on the mat, as flat as possible. Then push the area in and press the start button. The vinyl heat press machine will automatically apply the pressure, and the timer will count down. The heat plate will rise when the timer reaches zero. It means your blank is preheated. I preheated my shirt to 260℉ for 15 seconds. This step can remove moisture and wrinkles from your blank and make your pattern last longer without peeling off.
Step 3: Heat press your design
Place the weeded design on your blank as you like, and make sure the vinyl faces the blank. Remember to put a Teflon sheet on your vinyl or sublimation paper! If you use sublimation paper, you'd better place a piece of cardstock inside your blank to avoid ink damage on the back of it.
I like HTVRONT Auto Heat Press the most because there are 4 fast modes, each for different products! Usually, I won’t be confused about the parameter settings.
Mode 1: PU HTV (300℉ for 15 seconds)
Mode 2: Glitter HTV (330℉ for 20 seconds)
Mode 3: Transfer Paper (320℉ for 15 seconds)
Mode 4: Sublimation Paper (390℉ for 40 seconds)
I chose Mode 1. Moreover, this auto heat press has two user-defined memory modes, which can set temperature and time as needed and memorize usage habits. After selecting the mode, you can press the start button to heat-press your project.
Step 4: Remove the backing
Allow your project to cool, and remove the backing! It will be 24 hours before you can wash it.
You can set the auto mode if you need to heat press items in batches. So convenient and intelligent! The heat press machine for shirts combines the features of fast ironing and user-defined modes, which makes it easy to create a batch of similar products. Press the "Auto" key to start automatic ironing, and the display icon lights up. Once the heat plate is well pushed, the heat press machine for shirts will press down automatically.
Part 4: What can you do with your HTVRONT Auto Heat Press?
1. Customize wood decoration
Unimaginable! An ordinary piece of wood can be made into a beautiful decoration! Use the HTNRONT Auto Heat Press to add your favorite pattern to it. Then you can use the project to decorate your room or as a door tag. Bring you a retro feeling!
2. DIY light-color T-shirt
As you can see, white T-shirts are too common to find your outfit clashing with others. If you have an HTVRONT Auto Heat Press, you can make custom clothes for yourself or your family by heat pressing!
3. Design canvas bag
Many girls often use canvas bags in their daily lives. Different bags represent different personalities. I'm sure you want a personalized bag just like me so that you can stand out from the crowd when you are shopping or partying!
4. Sublimate dark-color T-shirt
It's time to demonstrate your brilliant ideas! Print your favorite images on sublimation paper and heat transfer them to a new dark-color T-shirt. Another piece of personalized clothing that makes you proud!
Part 5: HTVRONT Auto Heat Press VS Traditional Heat Press
That's all for how to use the HTVRONT Auto Heat Press. I hope you enjoyed learning about it!


![[Starter Kit] Auto Heat Press Machine 15" x 15" 110V + Starter Kit Bundle](http://www.htvront.com/cdn/shop/files/20240425-170634_385x.jpg?v=1714036345)
![[Premium Bundle] Auto Heat Press Machine 15" x 15" 110V + 20 rolls HTV Bundle 12“x3ft + Mini 2 Heat Press Machine + Random Sublimation & HTV Bundle ≥ $180](http://www.htvront.com/cdn/shop/files/1UK_4_22c12b1b-12dd-4105-ac25-93e2faae6a8c_385x.jpg?v=1713863580)


